

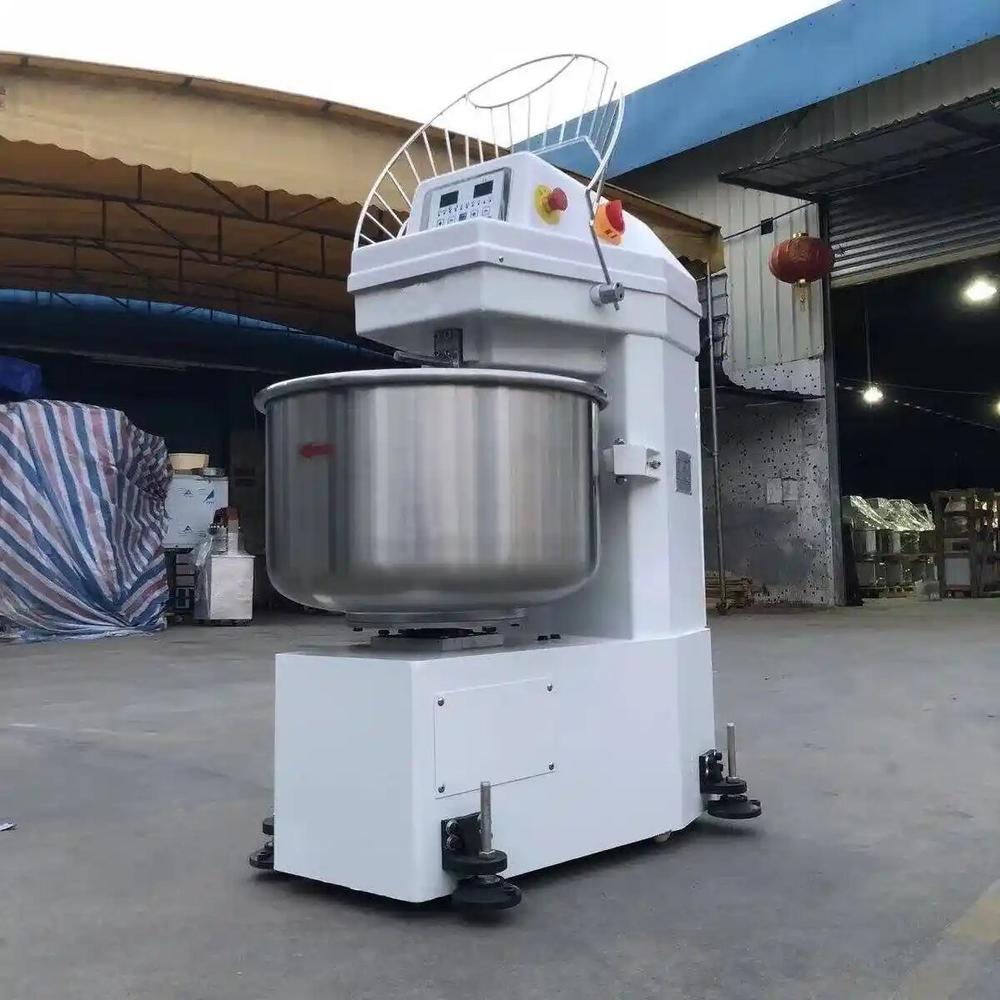
1. What is a Spiral Mixer?
A spiral mixer is the workhorse of any commercial bakery that produces bread, pizza, baguette, or other yeast-leavened doughs. It gets its name from the distinctive spiral-shaped dough hook that rotates on its own axis while the mixing bowl also rotates.
How It Works
The dual rotation (spiral hook + bowl) creates a unique kneading action that:
- Gently pulls and folds dough — developing gluten without overworking it
- Generates less friction heat — critical for yeast doughs that need to stay cool (ideal dough temperature after mixing: 24-28°C / 75-82°F)
- Handles high-hydration doughs — can mix wet, sticky doughs that planetary mixers struggle with
- Produces consistent results — every batch is mixed the same way, ensuring uniform dough quality
Key Components
- Spiral hook: The signature S-shaped or spiral-shaped dough hook that does the kneading
- Mixing bowl: Stainless steel bowl that rotates during mixing (fixed or removable depending on model)
- Motor: Usually 1-5 HP (0.75-3.7 kW), with belt or gear drive transmission
- Control panel: Timer, speed selector (1 or 2 speeds), emergency stop, start/stop buttons
- Safety guard: Wire mesh or solid guard that covers the bowl opening during operation
- Bowl lift (optional): On removable bowl models, a manual or electric lift to raise/lower the bowl
Why Every Bread Bakery Needs One
If you produce any of these, a spiral mixer is not optional — it is essential:
- Artisan bread (sourdough, ciabatta, focaccia)
- Baguettes and French bread
- Pizza dough (especially Neapolitan and New York style)
- Sandwich bread and pullman loaves
- Bagels and pretzels
- Any dough with hydration above 60%
2. Spiral vs Planetary Mixer: Which Do You Need?
This is the most common question when bakers are choosing a mixer. The answer depends entirely on what you bake.
| Feature | Spiral Mixer | Planetary Mixer |
|---|---|---|
| Mixing Action | Spiral hook + rotating bowl | Beater/whisk/hook orbits around stationary bowl |
| Best For | Bread, pizza, baguette, yeast doughs | Cakes, cookies, creams, frosting, whipping |
| Gluten Development | Excellent (gentle, thorough) | Good but can overwork dough |
| Heat Generation | Low (ideal for yeast dough) | Higher (can kill yeast in long mixes) |
| High-Hydration Dough | Excellent (handles 70%+ hydration) | Poor (dough climbs hook, hard to mix) |
| Versatility | Dough only (hook only) | Multi-purpose (beater, whisk, hook) |
| Batch Size | Large (10-300L+) | Small-Medium (5-80L) |
| Price Range | $1,500 - $35,000+ | $800 - $15,000 |
| Typical Lifespan | 15-25 years | 10-15 years |
The Short Answer
- Bread/pizza/baguette bakery: Get a spiral mixer. It is the only tool that will produce consistent, high-quality dough at commercial volume.
- Cake/pastry/cookie bakery: Get a planetary mixer. You need the versatility of beaters and whisks.
- Full-service bakery (bread + pastries): Get both. A spiral mixer for dough and a planetary mixer for creams, cakes, and toppings. This is the standard setup for most successful bakeries.
3. Types of Spiral Mixers
3.1 By Bowl Type: Fixed vs Removable
Fixed Bowl Spiral Mixers
The bowl is permanently attached to the mixer. Dough must be removed manually (scraped out) or through a bowl discharge door (on larger models).
Advantages: Lower cost, simpler mechanism, more reliable, less maintenance, smaller footprint.
Disadvantages: Can only mix one batch at a time, downtime between batches, harder to clean bowl thoroughly.
Best for: Small-medium bakeries, single dough type, budget-conscious operations.
Removable Bowl Spiral Mixers
The bowl can be lifted off and replaced with a second bowl. Usually sold with 1-2 bowls; additional bowls can be purchased separately.
Advantages: Multiple bowls ready for different dough types, reduced downtime between batches, easier to clean (take bowl to sink), can pre-stage ingredients in second bowl.
Disadvantages: Higher cost ($2,000-$5,000 more), requires bowl lift/trolley, larger footprint, more maintenance (lift mechanism).
Best for: Medium-large bakeries, multiple dough types, high-volume production, bakeries with limited mixer time.
3.2 By Speed: Single vs Dual Speed
Single Speed
One mixing speed only. Simpler and cheaper, but less control over the mixing process.
Best for: Simple dough recipes, small bakeries, budget operations.
Dual Speed (Two-Speed)
Low speed for ingredient incorporation and first mixing phase; high speed for gluten development. This is the industry standard for commercial spiral mixers.
Advantages: Better control over dough development, lower heat generation (slow start), faster mixing (high speed finish), more versatile for different dough types.
Best for: All commercial bakeries. Dual speed is worth the extra $500-$1,500.
3.3 By Control Type: Manual vs Digital
Manual (Mechanical Timer)
Simple mechanical timer, toggle switches for speed, start/stop buttons. Reliable and easy to repair.
Best for: Small bakeries, operations that prefer simple controls.
Digital (PLC/Touchscreen)
Digital control panel with programmable recipes, precise timers, phase control (slow/fast speed timing), and sometimes USB connectivity for recipe management.
Advantages: Consistent results every batch (programmable recipes), multiple operators get same results, data logging, error diagnostics.
Best for: Medium-large bakeries, multiple operators, quality-focused operations, bakeries producing many dough types.
3.4 By Size: Tabletop vs Floor
Tabletop Spiral Mixers
Compact models (10-20L) that sit on a counter or table. Lower capacity but space-efficient.
Best for: Small cafes, pizza shops, boutique bakeries, test kitchens, start-ups.
Floor Spiral Mixers
Free-standing models (30-300L+) with their own base/legs. The standard for commercial bakeries.
Best for: All commercial bakeries producing 20kg+ flour per batch.
4. How to Choose the Right Capacity
Choosing the right capacity is the most important decision when buying a spiral mixer. Too small and you need multiple batches per day (wasting time); too large and you waste money, energy, and floor space.
Step 1: Calculate Your Maximum Batch Size
Critical: Mixer capacity is rated by flour weight, NOT total dough weight.
A 40L spiral mixer can handle approximately 16kg of flour per batch. With 65% hydration, that produces about 26.4kg of total dough. If you use the mixer's full capacity, the dough should fill no more than 70-80% of the bowl (leave room for dough to expand during mixing).
Formula: Required flour capacity = (Daily dough production ÷ Number of batches per day) ÷ (1 + Hydration percentage)
Example: 100kg dough/day, 4 batches/day, 65% hydration → 100 ÷ 4 ÷ 1.65 = 15.15kg flour per batch → Need a 40L mixer (16kg flour capacity)
Step 2: Add Growth Buffer
Always choose a mixer that is 20-30% larger than your current maximum batch size. This accounts for:
- Business growth (most bakeries grow 10-20% per year)
- Seasonal peaks (holidays, special orders)
- New product additions (larger batch recipes)
- Occasional large orders (catering, wholesale)
Step 3: Match to Mixer Size
| Bakery Size | Daily Flour | Batches/Day | Recommended Mixer | Flour Capacity |
|---|---|---|---|---|
| Micro Bakery / Cafe | 5-15kg | 1-2 | 10-20L Tabletop | 4-8kg |
| Small Bakery | 15-50kg | 2-4 | 30-60L Floor | 12-25kg |
| Medium Bakery | 50-150kg | 3-6 | 80-120L Floor | 32-50kg |
| Large Bakery | 150-400kg | 4-8 | 160-250L Floor | 65-100kg |
| Industrial / Factory | 400kg+ | Continuous | 300L+ Industrial | 120kg+ |
Common Capacity Mistakes to Avoid
- ❌ Buying too small: "We'll just do more batches." This wastes 1-2 hours per day in extra mixing and cleanup. A larger mixer pays for itself in labor savings within months.
- ❌ Buying too large: "We'll grow into it." A 200L mixer running 20kg batches is inefficient (poor mixing, excessive energy use, takes up valuable floor space).
- ❌ Confusing total dough weight with flour weight: A 40L mixer does NOT hold 40kg of dough. It holds approximately 16kg of flour (which makes ~26kg of dough at 65% hydration).
- ❌ Ignoring hydration: High-hydration doughs (70%+) need more bowl space because they expand more during mixing. Size up 10-15% if you primarily mix high-hydration doughs.
5. Key Specifications to Check
5.1 Bowl Capacity (Liters)
The total volume of the mixing bowl. Remember: actual flour capacity is approximately 40% of bowl volume (e.g., 40L bowl = ~16kg flour).
5.2 Flour Capacity (kg)
The maximum weight of flour the mixer can handle in one batch. This is the number that matters most — always compare flour capacity, not bowl volume.
5.3 Motor Power (HP / kW)
The motor power determines how well the mixer handles heavy, stiff doughs. As a general rule:
- 10-20L: 0.5-1 HP (0.37-0.75 kW)
- 30-60L: 1-2 HP (0.75-1.5 kW)
- 80-120L: 2-3 HP (1.5-2.2 kW)
- 160-250L: 3-5 HP (2.2-3.7 kW)
- 300L+: 5-10 HP (3.7-7.5 kW)
Tip: If you mix stiff doughs (bagels, pretzels, low-hydration bread), size up the motor by 25-50%. Stiff doughs require significantly more torque.
5.4 Number of Speeds
Look for at least 2 speeds (slow for incorporation, fast for gluten development). Some premium models offer variable speed or 3+ speeds. Dual speed is the industry standard and worth the extra cost.
5.5 Timer
A built-in timer is essential for consistent results. Mechanical timers are reliable; digital timers offer more precision and programmability. Look for a timer that can be set for each speed phase separately (e.g., 3 min slow + 7 min fast).
5.6 Bowl Material
Always choose 304 food-grade stainless steel. Avoid 201 stainless (lower quality, can corrode) or painted steel (chips and contaminates dough). The bowl should have a smooth, polished interior for easy cleaning.
5.7 Safety Features
Essential safety features include:
- Emergency stop button (large, red, easily accessible)
- Bowl guard (wire mesh or solid guard that prevents hands from entering during operation)
- Guard interlock (mixer stops if guard is opened during operation)
- Motor overload protection (automatic shutoff if motor overheats)
- Stable base (heavy construction to prevent walking/vibration during operation)
- Non-slip feet or floor mounting options
5.8 Dimensions & Weight
Check that the mixer fits through your doors and in your planned space. Also check floor load capacity — large mixers (160L+) can weigh 500-1,000kg and may require reinforced flooring.
5.9 Power Requirements
Check voltage (220V/380V/440V), phase (single/three), and frequency (50/60Hz). Most floor models 60L+ require 380V three-phase power. Make sure your electrical system can support the mixer, or budget for an electrician to upgrade your panel.
5.10 Certification
Check for relevant certifications: CE (European Union), ETL/UL (United States/Canada), ISO 9001 (quality management). Certification ensures the mixer meets safety and quality standards for your target market.
6. Price Guide: How Much Does a Spiral Mixer Cost?
| Mixer Size | Flour Capacity | Price Range (USD) | Typical Motor |
|---|---|---|---|
| Tabletop 10L | 4kg | $1,500 - $3,000 | 0.5 HP |
| Tabletop 20L | 8kg | $2,500 - $4,500 | 1 HP |
| Floor 30L | 12kg | $3,000 - $6,000 | 1 HP |
| Floor 40L | 16kg | $4,000 - $7,500 | 1.5 HP |
| Floor 60L | 25kg | $5,000 - $9,000 | 2 HP |
| Floor 80L | 32kg | $6,500 - $11,000 | 2 HP |
| Floor 120L | 50kg | $8,000 - $14,000 | 3 HP |
| Floor 160L | 65kg | $10,000 - $18,000 | 3 HP |
| Floor 200L | 80kg | $13,000 - $22,000 | 4 HP |
| Floor 250L | 100kg | $16,000 - $28,000 | 5 HP |
| Industrial 300L+ | 120kg+ | $20,000 - $40,000+ | 5-10 HP |
Factors That Affect Price
- Brand: European brands (Doyon, Bongard, WP, Kemper) cost 2-3x more than Chinese brands with similar specifications. Chinese brands (HNH, Sinmag, Kolb) offer excellent value for money.
- Removable bowl: Adds $2,000-$5,000 to the price (includes bowl lift mechanism + 1 extra bowl)
- Digital controls: Adds $500-$2,000 (PLC/touchscreen with programmable recipes)
- Dual speed: Adds $300-$800 compared to single speed
- Extra bowls: $300-$1,500 each (depending on size)
- Certification: CE/ETL certification adds $200-$1,000
- Special voltage: Custom voltage (e.g., 440V/60Hz) adds $200-$500
Total Cost of Ownership
Over a 15-year lifespan, the purchase price is only 50-60% of total cost:
- Purchase price: 50-60%
- Energy consumption: 15-25% (electricity to run the mixer)
- Maintenance & parts: 10-15% (belts, seals, bearings, annual service)
- Labor savings: Offsets 40-60% of total cost (a spiral mixer replaces 1-2 workers doing hand mixing)
7. Maintenance & Care
Proper maintenance is the difference between a spiral mixer that lasts 10 years and one that lasts 25 years.
Daily Maintenance (After Each Use)
- Scrape out all dough residue from bowl and hook
- Wipe bowl interior with food-safe sanitizer (do NOT use abrasive scouring pads — they scratch stainless steel)
- Wipe down exterior of mixer
- Check for any dough buildup around the hub seal (dough that gets into the seal can cause premature wear)
- Verify emergency stop button works
- Check power cord and connections
- Leave bowl open to air dry (do not close wet bowl — moisture causes corrosion)
Weekly Maintenance
- Deep clean bowl and hook (remove hook if possible for thorough cleaning)
- Clean under and around mixer (flour and dough buildup attracts pests)
- Check belt tension (press belt with finger — should deflect 1-2cm, not more)
- Lubricate bowl lift mechanism (if removable bowl model) with food-grade grease
- Check all safety guards and interlocks
- Inspect power cord for damage
- Check for unusual noises during operation
Monthly Maintenance
- Inspect motor and gearbox for unusual noises or vibrations
- Check electrical connections and tighten if loose
- Inspect spiral hook for wear or damage (replace if bent or cracked)
- Check bowl for dents or damage (dents can affect mixing action)
- Verify all safety features are functioning correctly
- Clean motor ventilation vents (dust buildup causes overheating)
- Check floor mounting bolts (tighten if loose — vibration can loosen them over time)
Annual Professional Service
- Gearbox oil change (use manufacturer-recommended oil grade)
- Motor inspection and testing (check winding insulation, bearing play)
- Replacement of worn parts (belts, seals, bearings, brushes if applicable)
- Full electrical system inspection and testing
- Safety certification renewal (if required by local regulations)
- Calibration of timer and speed controls (digital models)
- Lubrication of all moving parts per manufacturer specifications
Common Wear Parts to Keep in Stock
- Drive belts (replace every 3-5 years or when cracked/glazed)
- Bowl seal / hub seal (replace every 2-3 years or if dough leaks into hub)
- Bearings (replace every 5-8 years or if noisy)
- Spiral hook (keep spare — if hook breaks, production stops)
- Emergency stop button (keep spare)
- Carbon brushes (if motor has brushes — replace every 2-3 years)
- Gearbox oil (for annual oil change)
8. Common Problems & Troubleshooting
Problem 1: Dough Not Developing Properly (Weak, Tearing)
Possible causes:
- Under-mixing (not enough time on fast speed)
- Over-mixing (dough passed windowpane stage, gluten breaking down)
- Wrong hook speed (mixing on slow speed the entire time)
- Dough too warm (yeast activated too early, dough weak)
- Flour quality issue (old flour, low protein content)
- Hydration too high or too low for recipe
Solutions: Check mixing time (typical: 3-5 min slow + 5-10 min fast), verify dough temperature after mixing (24-28°C ideal), check flour protein content (11-13% for bread), adjust hydration.
Problem 2: Dough Climbing Up the Hook
Possible causes:
- Hydration too high (dough too sticky)
- Under-mixed dough (not developed enough, too sticky)
- Hook speed too high for initial mixing (should start on slow speed)
- Bowl too small for batch (dough has nowhere to go but up)
- Hook worn or wrong shape (not pulling dough down properly)
Solutions: Start on slow speed for 2-3 minutes to incorporate ingredients, reduce hydration slightly, ensure batch size is within mixer capacity, check hook condition.
Problem 3: Mixer Vibrates Excessively or "Walks"
Possible causes:
- Mixer not level (uneven floor)
- Floor mounting bolts loose
- Unbalanced load (dough all on one side of bowl)
- Worn bearings or gears
- Bent or damaged spiral hook
- Motor mount loose
Solutions: Level the mixer with a spirit level, tighten floor bolts, ensure dough is evenly distributed in bowl, inspect hook for damage, listen for bearing noise. If vibration persists, contact technician.
Problem 4: Mixer Won't Start
Possible causes:
- Safety guard not properly closed (interlock switch not engaged)
- Emergency stop button pressed (twist to release)
- Power not connected (check plug, circuit breaker)
- Motor thermal overload tripped (wait 15-30 minutes to cool, press reset button)
- Timer set to zero (set timer before starting)
- Control panel fault (digital models — check error code)
Solutions: Check all safety interlocks, release emergency stop, verify power connection, allow motor to cool, check timer setting. If still won't start, contact technician.
Problem 5: Unusual Noises During Operation
Possible causes:
- Loose belt (squealing noise — tighten or replace)
- Worn bearings (grinding/rumbling noise — replace bearings)
- Gearbox issue (clanking/knocking noise — check gear oil, contact technician)
- Motor issue (buzzing/humming — check capacitor, windings)
- Foreign object in bowl (clanking — stop immediately, inspect bowl)
- Loose hardware (rattling — tighten all bolts and screws)
Solutions: Identify the type of noise and location. Stop mixer immediately if noise is severe or accompanied by vibration. Belt noise can be fixed by tensioning/replacing belt. Bearing/gearbox/motor issues require professional service.
Problem 6: Dough Temperature Too High After Mixing
Possible causes:
- Over-mixing (too much friction heat)
- Ingredients too warm (flour, water not chilled)
- Room temperature too high
- Mixer not allowing dough to rest (continuous mixing without break)
- Fast speed used for too long
- Bowl not chilled (for warm climates, use chilled bowl or ice water jacket)
Solutions: Use cold water (4-10°C) for mixing, chill flour in hot weather, reduce mixing time, use autolyse (rest dough 20-30 min before final mixing), consider bowl cooling jacket for large mixers in warm climates. Target dough temperature: 24-28°C (75-82°F).
9. Dough Mixing Tips & Techniques
The Ideal Mixing Process (Autolyse Method)
- Mix flour + water only on slow speed for 2-3 minutes until just combined
- Rest (autolyse) for 20-30 minutes (cover bowl, let flour hydrate naturally — this develops gluten without mixing heat)
- Add salt + yeast (and any other ingredients)
- Mix slow speed for 2-3 minutes to incorporate
- Mix fast speed for 5-10 minutes until gluten is fully developed (windowpane test)
- Check dough temperature — should be 24-28°C (75-82°F)
Windowpane Test (How to Know When Dough is Done)
Take a small piece of dough and stretch it between your fingers. If it stretches into a thin, translucent membrane without tearing, the gluten is fully developed. If it tears easily, continue mixing for 1-2 more minutes and test again.
Temperature Control Tips
- Use cold water (4-10°C) for mixing in warm weather
- Chill flour in refrigerator or freezer for 30 minutes before mixing (hot climates)
- Use a bowl cooling jacket or ice water bath for large batches
- Keep bakery temperature at 18-22°C (64-72°F) if possible
- Use the autolyse method to reduce mixing time and heat generation
- Never let dough exceed 30°C (86°F) — yeast becomes stressed and produces off-flavors
Batch Size Tips
- Never exceed 80% of mixer's rated flour capacity (leave room for dough expansion)
- Never mix less than 20% of rated capacity (small batches don't mix properly — hook can't reach dough)
- For very small batches, use a smaller mixer or hand mix
- For high-hydration doughs (70%+), reduce batch size by 10-15%
- For stiff doughs (bagels, pretzels, <55% hydration), reduce batch size by 20-25% (more torque needed)
Cleaning Tips
- Scrape bowl while dough is still soft (easier to clean than dried dough)
- Use a plastic bowl scraper (not metal — metal scratches stainless steel)
- Wipe with warm, soapy water, then sanitize
- Never use abrasive scouring pads or steel wool on stainless steel
- Remove hook and clean separately (dough gets trapped under hook hub)
- Clean under mixer weekly (flour buildup attracts pests and can cause fire hazard)
- Leave bowl open to air dry completely before storing
10. Our Spiral Mixer Models
HNH Bakery Equipment offers a complete range of spiral mixers for every production volume and budget.
Spiral Mixer 20L
Tabletop or floor model, 8kg flour capacity, 1 HP motor, dual speed, ideal for small bakeries and cafes.
View Details →Spiral Mixer 40L
Floor model, 16kg flour capacity, 1.5 HP motor, dual speed, the most popular size for medium bakeries.
View Details →Spiral Mixer 60L
Floor model, 25kg flour capacity, 2 HP motor, dual speed, ideal for growing medium bakeries.
View Details →Spiral Mixer 80L
Floor model, 32kg flour capacity, 2 HP motor, dual speed, available with removable bowl option.
View Details →Spiral Mixer 120L
Floor model, 50kg flour capacity, 3 HP motor, dual speed, digital timer, removable bowl available.
View Details →Spiral Mixer (Main Category)
Complete range of spiral mixers from 10L to 300L+. Compare all models, specifications, and prices.
View All →