
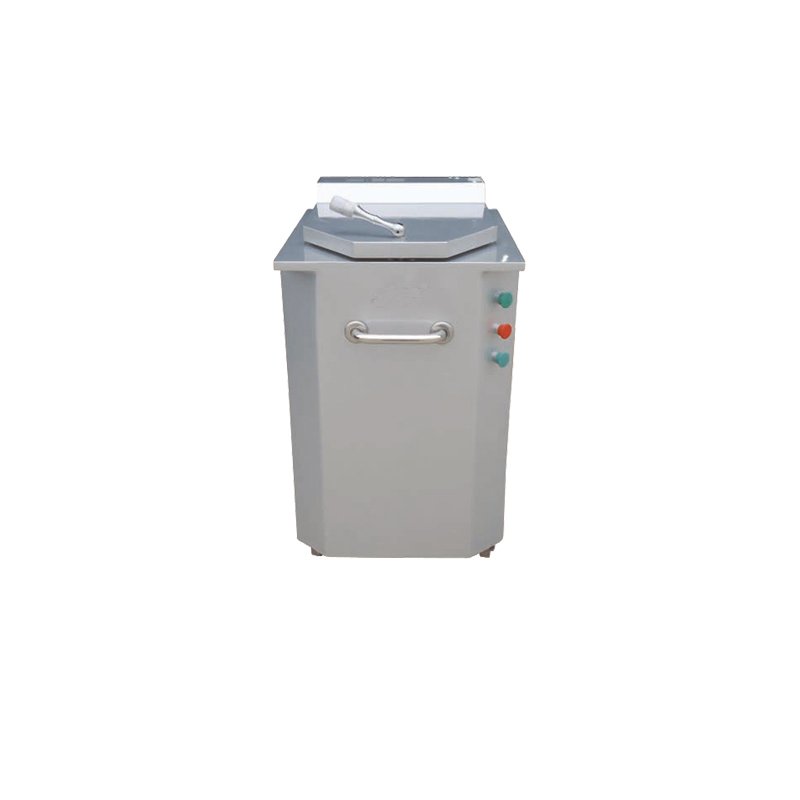
1. What Is a Hydraulic Dough Divider?
A hydraulic dough divider is a specialized commercial bakery machine designed to divide large batches of dough into uniform portions by weight. It is one of the most important labor-saving devices in a high-volume bakery, replacing the slow and inconsistent process of hand-cutting dough with a fast, precise, automated system.
The machine uses hydraulic pressure — the same technology found in construction equipment, car lifts, and industrial presses — to generate the force needed to push sharp dividing blades through large blocks of dough. This hydraulic force is consistent, controllable, and powerful enough to divide even very stiff or dense dough.
Key Characteristics
- High accuracy — ±1-2% weight variation, far better than manual dividing (±5-10%)
- Fast operation — 5-15 seconds per dividing cycle, compared to 1-2 minutes for manual hand-cutting
- Large capacity — Handles dough blocks from 5kg to 30kg+, dividing into 10-60 pieces at once
- Wide portion range — Can divide portions from 50g (small rolls) to 5kg+ (large bread loaves or pizza dough blocks)
- Consistent results — Every piece has the same weight, shape, and density, ensuring uniform baking and consistent product quality
- Labor saving — One operator can run the machine, replacing 2-3 workers doing manual dividing
- Versatile — Works with bread dough, pizza dough, roll dough, sweet dough, and most other bakery dough types
Who Uses Hydraulic Dough Dividers?
| Business Type | Typical Use | Portion Size | Daily Volume |
|---|---|---|---|
| Commercial bread bakery | Dividing dough for sandwich bread, artisan loaves | 400g-1kg | 200-2,000 loaves |
| Pizza production | Dividing pizza dough balls | 200-400g | 500-5,000 balls |
| Roll/bun bakery | Dividing dough for hamburger buns, dinner rolls | 50-100g | 1,000-10,000 rolls |
| Hotel/institutional kitchen | Dividing dough for various bread products | 50g-1kg | 100-500 pieces |
| Food factory/industrial | High-volume dough dividing for production lines | 100g-2kg | 5,000+ pieces |
| Supermarket in-store bakery | Fresh bread and roll production | 50g-800g | 100-500 pieces |
2. How Does a Hydraulic Dough Divider Work?
Understanding how a hydraulic dough divider works helps you operate it correctly, maintain it properly, and troubleshoot issues. The machine has four main components: the hydraulic system, the dividing chamber, the blade assembly, and the control system.
The Four Main Components
- Hydraulic system: The power source. Includes a hydraulic pump (driven by an electric motor), hydraulic fluid reservoir, control valves, and hydraulic cylinders/pistons. The pump pressurizes hydraulic fluid (typically 50-150 bar / 700-2,000 psi), which is directed by valves to the pistons. The hydraulic fluid also lubricates and cools the system.
- Dividing chamber: The box or tray where the dough is placed. It has a fixed number of cavities (10, 20, 36, etc.) that determine how many pieces the dough is divided into. The chamber is usually made of food-grade stainless steel and has a removable base for easy cleaning. The dough is pressed evenly into the chamber before dividing.
- Blade assembly: A grid of sharp stainless steel blades that cuts through the dough. The blades are arranged to match the chamber cavities — when the hydraulic piston pushes the blade assembly down, each blade cuts between cavities, dividing the dough into equal pieces. Blades must be kept sharp for clean cuts; dull blades tear dough and cause uneven pieces.
- Control system: The operator interface. Includes start/stop buttons, emergency stop, pressure gauge, and sometimes a digital control panel with programmable settings. The operator loads dough, presses the start button, and the machine automatically completes the dividing cycle (blade down → hold → blade up → chamber release).
Step-by-Step Operation Cycle
- Prepare dough block: After bulk fermentation, the dough is weighed and formed into a block that fits the dividing chamber. The dough block should be slightly larger than the chamber volume to ensure all cavities are filled. Dough temperature should be 24-26°C for best results.
- Load dough into chamber: Place the dough block into the dividing chamber. Press it evenly into all corners and cavities, ensuring no air pockets. Some machines have a pressing plate that compresses the dough evenly. The dough should fill the chamber completely — under-filled chambers produce uneven pieces.
- Start dividing cycle: Close the safety guard and press the start button. The hydraulic pump activates, pressurizing the system. The control valve directs hydraulic fluid to the main piston, which pushes the blade assembly downward.
- Blades cut through dough: The sharp blades descend through the dough, cutting it into equal pieces. The hydraulic pressure ensures even, consistent cutting force. The blades hold position for 1-2 seconds to ensure complete separation.
- Blades retract: The control valve reverses, directing hydraulic fluid to retract the piston. The blade assembly rises, leaving the divided dough pieces in the chamber cavities.
- Remove divided pieces: Open the chamber and remove the divided dough pieces. They are now ready for pre-shaping, final shaping, or direct panning. Most operators transfer pieces to a worktable or conveyor for the next production step.
- Clean and repeat: Quickly wipe any dough residue from the chamber and blades, then load the next dough block. A complete cycle (load + divide + unload) takes 1-3 minutes depending on operator speed and machine size.
🔧 Hydraulic System Pressure Explained
Most hydraulic dough dividers operate at 50-150 bar (700-2,000 psi) of hydraulic pressure. This is the pressure of the hydraulic fluid inside the system, not the pressure on the dough. The actual force on the dough depends on the piston area: Force = Pressure × Piston Area. A 100mm piston at 100 bar generates about 7,850 Newtons (about 800kg or 1,760 lbs) of force — more than enough to cut through even very stiff dough. The pressure gauge on the machine shows system pressure; if it's below the manufacturer's specified range, the machine may not cut completely, resulting in connected or uneven pieces.
3. Types of Hydraulic Dough Dividers
Hydraulic dough dividers come in several types, classified by size, capacity, and automation level. Choosing the right type depends on your production volume, available space, portion size needs, and budget.
Type 1: Tabletop / Benchtop Hydraulic Divider
| Feature | Specification |
|---|---|
| Capacity (cavities) | 10-20 cavities |
| Portion size range | 50-500g |
| Max dough block | 5-10kg |
| Output | 200-500 pieces/hour |
| Dimensions | 500×500×600mm (20×20×24 inches) |
| Weight | 50-100kg |
| Power | 0.5-1.0 kW, 220V single phase |
| Price | $3,000-$5,000 |
| Best for | Small bakeries, cafes, pizza shops, start-ups |
Pros: Compact, affordable, fits on standard worktable, easy to move, single-phase power (no special electrical needed). Cons: Limited capacity, smaller portion range, slower output, manual loading/unloading.
Type 2: Floor-Standing Medium Hydraulic Divider
| Feature | Specification |
|---|---|
| Capacity (cavities) | 20-36 cavities |
| Portion size range | 100g-1.5kg |
| Max dough block | 10-20kg |
| Output | 500-1,200 pieces/hour |
| Dimensions | 800×700×1,400mm (31×28×55 inches) |
| Weight | 200-400kg |
| Power | 1.5-2.2 kW, 220V/380V |
| Price | $5,000-$8,000 |
| Best for | Medium bakeries, pizza production, roll bakeries (most popular size) |
Pros: Good balance of capacity and price, versatile portion range, handles most bakery needs, durable construction, stainless steel options available. Cons: Requires floor space, heavier (needs 2+ people to move), may need 3-phase power for larger models.
Type 3: Large Industrial Hydraulic Divider
| Feature | Specification |
|---|---|
| Capacity (cavities) | 36-60+ cavities |
| Portion size range | 200g-5kg+ |
| Max dough block | 20-50kg |
| Output | 1,000-3,000 pieces/hour |
| Dimensions | 1,200×1,000×1,800mm (47×39×71 inches) |
| Weight | 500-1,000kg+ |
| Power | 3-5.5 kW, 380V 3-phase |
| Price | $8,000-$15,000+ |
| Best for | Large bakeries, food factories, industrial production lines, wholesale operations |
Pros: Maximum capacity and output, handles very large dough blocks and portions, built for continuous operation, heavy-duty construction. Cons: Expensive, large footprint, very heavy (needs forklift to move), requires 3-phase power, overkill for small/medium operations.
Type 4: Fully Automatic Hydraulic Divider with Conveyor
| Feature | Specification |
|---|---|
| Automation level | Fully automatic — dough loading, dividing, and unloading via conveyor |
| Capacity | 36-60+ cavities |
| Output | 2,000-5,000+ pieces/hour |
| Features | Conveyor in/out, automatic dough pressing, PLC control, programmable recipes, safety guarding |
| Price | $15,000-$30,000+ |
| Best for | Industrial production lines, high-volume factories, automated bakeries |
Pros: Maximum output, minimal labor (1 operator can run multiple machines), consistent results, programmable for different dough types, integrates with production lines. Cons: Very expensive, complex (requires trained operators), large footprint, requires 3-phase power and compressed air, higher maintenance costs.
⚠️ Important: Single-Phase vs. 3-Phase Power
Small tabletop models (10-20 cavities) typically use 220V single-phase power, which is available in any standard electrical outlet. Medium and large models (20+ cavities) often require 380V 3-phase power, which may not be available in all locations — especially in older buildings, retail spaces, or home-based bakeries. Before purchasing a medium or large hydraulic divider, verify that your location has 3-phase power available. If not, you may need to: (1) choose a single-phase model (limited to smaller capacity), (2) have 3-phase power installed by an electrician ($1,000-$5,000+ depending on location), or (3) use a phase converter ($500-$2,000) to convert single-phase to 3-phase. Always check power requirements before buying.
4. Capacity & Production Output
Choosing the right capacity is the most important decision when buying a hydraulic dough divider. A machine that's too small slows down production and creates bottlenecks; a machine that's too large wastes money, space, and energy.
How to Calculate Your Required Capacity
Follow these steps to determine the right size:
- Calculate daily dough weight: Add up the total weight of all dough you produce per day. Example: 300 sandwich loaves × 500g = 150kg; 200 rolls × 80g = 16kg; total = 166kg/day.
- Determine peak production window: How many hours per day do you actually divide dough? Most bakeries divide dough in a 2-4 hour window (after bulk fermentation, before shaping). Example: 3 hours.
- Calculate required hourly throughput: Daily dough weight ÷ production hours = required kg/hour. Example: 166kg ÷ 3 hours = 55kg/hour.
- Add 30-50% buffer: For busy days, seasonal peaks, and growth. Example: 55kg × 1.4 = 77kg/hour target.
- Match to machine capacity: A 20-cavity machine dividing 500g loaves processes 10kg/cycle. At 3 minutes/cycle (load + divide + unload), that's 200kg/hour — well above the 77kg/hour target. A 10-cavity machine would process 100kg/hour — also sufficient but with less buffer.
Production Output by Machine Size
| Machine Size | Cavities | kg/Cycle (500g loaves) | Cycles/Hour | kg/Hour | Loaves/Hour |
|---|---|---|---|---|---|
| Small tabletop | 10 | 5kg | 15-20 | 75-100kg | 150-200 |
| Small tabletop | 20 | 10kg | 15-20 | 150-200kg | 300-400 |
| Medium floor | 20 | 10kg | 20-25 | 200-250kg | 400-500 |
| Medium floor | 36 | 18kg | 20-25 | 360-450kg | 720-900 |
| Large industrial | 36 | 18kg | 25-30 | 450-540kg | 900-1,080 |
| Large industrial | 60 | 30kg | 25-30 | 750-900kg | 1,500-1,800 |
| Fully automatic | 60+ | 30kg+ | 30-40 | 900-1,200kg+ | 1,800-2,400+ |
Note: Output assumes 500g loaf portions and efficient operation. Smaller portions (rolls, pizza dough) allow more pieces per kg but similar kg/hour throughput.
Capacity for Pizza Dough Production
Pizza dough is one of the most common uses for hydraulic dividers. Pizza dough balls are typically 200-300g for 12-14 inch pizzas.
| Machine Size | Pizza Balls/Cycle (250g) | Balls/Hour | Pizzas/Day (8hr shift) |
|---|---|---|---|
| 10-cavity tabletop | 10 | 150-200 | 1,200-1,600 |
| 20-cavity | 20 | 300-400 | 2,400-3,200 |
| 36-cavity medium | 36 | 720-900 | 5,760-7,200 |
| 36-cavity large | 36 | 900-1,080 | 7,200-8,640 |
| 60-cavity industrial | 60 | 1,500-1,800 | 12,000-14,400 |
💡 Capacity Planning Rule of Thumb
Choose a hydraulic divider that can handle your peak daily production in 2-3 hours, not 8 hours. This gives you: (1) flexibility for busy days and seasonal peaks, (2) time for other tasks (mixing, shaping, baking), (3) room for business growth without immediately needing a larger machine, (4) ability to handle rush orders. If your current production is 100kg/day, choose a machine that can do 200-300kg/day in 2-3 hours. It's better to have capacity you don't use yet than to outgrow the machine in 6 months. Most bakeries find that once they have a divider, production increases because the bottleneck is removed.
5. Technical Specifications
Understanding the technical specifications helps you compare machines and choose the right one for your needs. Here are the key specifications to look for.
Standard Specifications for a 36-Cavity Medium Hydraulic Divider
| Specification | Typical Value | Notes |
|---|---|---|
| Number of cavities | 36 | Determines pieces per cycle |
| Portion weight range | 100g - 1.5kg | Adjustable by changing cavity plates or using spacers |
| Max dough block weight | 18-20kg | Total dough per cycle |
| Dividing accuracy | ±1-2% | Weight variation between pieces |
| Cycle time (dividing only) | 5-10 seconds | Blade down + hold + blade up |
| Total cycle (load + divide + unload) | 1.5-3 minutes | Depends on operator speed |
| Output | 500-1,000 pieces/hour | At 500g portions |
| Hydraulic pressure | 80-120 bar (1,160-1,740 psi) | System pressure |
| Hydraulic fluid capacity | 5-15 liters | Food-grade hydraulic oil |
| Motor power | 1.5-2.2 kW (2-3 HP) | Electric motor driving hydraulic pump |
| Voltage | 220V / 380V, 50/60Hz | Check single vs. 3-phase |
| Machine dimensions (W×D×H) | 800×700×1,400mm | 31×28×55 inches |
| Machine weight | 250-350kg | 550-770 lbs |
| Construction material | Stainless steel (304) + painted steel frame | Food-contact parts should be stainless steel |
| Blade material | Stainless steel (420 or 304) | Should be removable for sharpening/replacement |
| Safety features | Emergency stop, safety guard, interlock switch | Essential for operator safety |
| Noise level | 65-75 dB | Similar to a vacuum cleaner |
| Certifications | CE, ISO 9001, sometimes ETL/UL | CE is standard for European market |
Optional Features to Look For
- Interchangeable cavity plates — Allow changing the number of cavities or portion size without buying a new machine. A machine with 36-cavity and 20-cavity plates gives you flexibility for different products.
- Digital control panel — Programmable settings for different dough types, adjustable pressure, cycle counter, and diagnostics. More consistent results and easier operation.
- Automatic dough pressing — A hydraulic press that evenly compresses the dough into the chamber before dividing, ensuring uniform filling and more accurate portions. Reduces operator effort.
- Conveyor system — Automated loading and unloading, reducing labor and increasing output. Essential for high-volume production lines.
- Stainless steel construction — Full stainless steel body (not just food-contact parts) for durability, hygiene, and easy cleaning. Worth the extra cost in a bakery environment.
- Mobile base / casters — Locking wheels allow moving the machine for cleaning or reconfiguration. Useful in smaller bakeries where space is flexible.
- Flour dusting system — Automatically dusts the chamber with flour to prevent dough sticking. Reduces manual flour application and ensures consistent non-stick performance.
- Oil heating/cooling system — Maintains consistent hydraulic fluid temperature, ensuring consistent dividing pressure regardless of ambient temperature. Important in hot climates or for continuous operation.
6. Price Guide
Hydraulic dough dividers range widely in price depending on capacity, features, brand, and country of manufacture. Here's a comprehensive price guide.
Price Range by Machine Type
| Machine Type | Budget Price | Mid-Range Price | Premium Price | What You Get |
|---|---|---|---|---|
| Tabletop 10-cavity | $2,500-$3,500 | $3,500-$4,500 | $4,500-$6,000 | Basic to premium small divider |
| Tabletop 20-cavity | $3,500-$4,500 | $4,500-$6,000 | $6,000-$8,000 | Popular small/medium size |
| Floor 20-cavity | $4,000-$5,500 | $5,500-$7,000 | $7,000-$9,000 | Medium capacity, floor model |
| Floor 36-cavity | $5,000-$6,500 | $6,500-$8,500 | $8,500-$12,000 | Most popular medium/large size |
| Floor 60-cavity | $8,000-$10,000 | $10,000-$13,000 | $13,000-$18,000 | Large industrial capacity |
| Fully automatic 36-cavity | $12,000-$15,000 | $15,000-$20,000 | $20,000-$30,000 | Automated with conveyor |
| Fully automatic 60-cavity+ | $18,000-$25,000 | $25,000-$35,000 | $35,000-$50,000+ | Industrial production line |
Price by Brand / Country of Manufacture
| Brand Origin | 36-Cavity Price | Quality | Warranty | Notes |
|---|---|---|---|---|
| Chinese manufacturer (direct) | $5,000-$7,000 | Good to very good | 1-2 years | Excellent value; quality has improved dramatically; choose reputable factory with CE certification |
| Chinese brand (via distributor) | $7,000-$10,000 | Good to very good | 1-2 years | Same machines as direct, but with local distributor support and markup |
| Taiwanese / Korean | $8,000-$12,000 | Very good | 1-2 years | Good quality, reliable, mid-range pricing |
| Italian (entry brand) | $10,000-$15,000 | Very good to excellent | 1-2 years | Italy is the gold standard for bakery equipment; excellent design and build |
| Italian (premium brand) | $15,000-$25,000 | Excellent | 2-3 years | Premium Italian brands (e.g., Rondo, Diosna); top quality, features, and support |
| German / Austrian | $15,000-$30,000 | Excellent | 2-3 years | Industrial-grade quality, built for 24/7 operation; very expensive |
| American | $12,000-$25,000 | Good to very good | 1-2 years | Some US brands; often rebadged Chinese/Taiwanese machines with US support |
Additional Costs to Consider
| Cost Item | Estimated Cost | Notes |
|---|---|---|
| Shipping / freight | $200-$1,500 | Domestic: $200-$500; International sea freight: $500-$1,500; Air freight: $1,000-$3,000 |
| Installation / setup | $0-$500 | Most machines are plug-and-play; may need electrician for 3-phase connection ($200-$500) |
| Training | $0-$1,000 | Basic operation is simple; some suppliers offer free video training; on-site training costs extra |
| Spare parts (initial) | $200-$500 | Extra blades, seals, hydraulic fluid, filters. Good to have on hand. |
| Annual maintenance | $100-$300/year | Hydraulic fluid change, filter replacement, blade sharpening |
| Warranty extension | $300-$1,000 | Extending from 1 year to 2-3 years |
💡 Price vs. Value: What to Really Consider
When comparing prices, don't just look at the upfront cost. Consider the total cost of ownership over 5-10 years: (1) A $6,000 Chinese machine that lasts 8 years with minimal repairs costs $750/year. (2) A $15,000 Italian machine that lasts 15 years costs $1,000/year. (3) But if the Chinese machine needs $500/year in repairs and the Italian only $100/year, the gap narrows. Key factors: availability of spare parts (Chinese machines may have longer lead times for parts), local service support (a nearby technician can save days of downtime), and accuracy consistency (a machine that drifts out of calibration costs you money in wasted dough). For most small and medium bakeries, a well-chosen Chinese machine from a reputable factory offers the best value — you get 80-90% of the performance of premium European brands at 40-50% of the price. The savings can be invested in other equipment or marketing.
7. How to Choose the Right Hydraulic Dough Divider
With so many options, choosing the right hydraulic dough divider can be overwhelming. Follow this systematic approach to make the best decision for your bakery.
Step 1: Define Your Requirements
| Requirement | Questions to Ask | Why It Matters |
|---|---|---|
| Daily production volume | How many loaves/rolls/pizza balls do you make per day? Peak days? | Determines required machine capacity |
| Portion sizes | What size portions do you need? Smallest? Largest? | Determines cavity size range and whether you need interchangeable plates |
| Dough types | What doughs will you divide? Bread? Pizza? Sweet? Whole wheat? Gluten-free? | Very stiff or very soft doughs may need specific machine features |
| Available space | How much floor/table space do you have? Doorways for delivery? | Determines machine size constraints |
| Power availability | Do you have 3-phase power? Single-phase only? | Critical — many machines need 3-phase |
| Budget | What's your total budget including shipping, installation, spare parts? | Narrows down options |
| Growth plans | Do you expect production to increase in the next 1-3 years? By how much? | Choose a machine with room to grow |
| Operator skill level | Who will operate the machine? Experienced baker? New employee? | Determines needed automation level and ease of use |
Step 2: Narrow Down by Capacity
Based on your requirements, use this quick guide:
| Daily Production | Recommended Machine | Cavities | Price Range |
|---|---|---|---|
| Under 100 loaves/day | Tabletop or manual divider | 10 | $2,500-$4,000 |
| 100-300 loaves/day | Tabletop 20-cavity or floor 20-cavity | 20 | $3,500-$6,000 |
| 300-800 loaves/day | Floor 36-cavity (most popular) | 36 | $5,000-$8,500 |
| 800-2,000 loaves/day | Large floor 36-60 cavity | 36-60 | $8,000-$15,000 |
| 2,000+ loaves/day | Fully automatic with conveyor | 60+ | $15,000-$30,000+ |
Step 3: Evaluate Key Features
Once you've narrowed down by capacity, evaluate these features:
- Stainless steel construction — Essential for hygiene and durability in a bakery. At minimum, all food-contact surfaces (chamber, blades, dough-contact parts) should be 304 stainless steel. Full stainless steel body is preferred.
- Interchangeable cavity plates — Highly recommended. Allows you to change portion sizes or number of pieces without buying a new machine. A 36-cavity machine with optional 20-cavity and 10-cavity plates gives you maximum flexibility.
- Safety features — Non-negotiable. Must have: emergency stop button (large, red, easily accessible), safety guard/cover that prevents access to blades during operation, interlock switch that stops the machine if the guard is opened, and overload protection.
- Hydraulic system quality — Look for: name-brand hydraulic pump (e.g., Yuken, Rexroth), pressure gauge (visible to operator), quality hydraulic hoses with secure fittings, and accessible fluid reservoir for easy checking and changing.
- Blade quality and replaceability — Blades should be: stainless steel, sharp (factory-honed), removable for sharpening or replacement, and available as spare parts. Dull blades are the #1 cause of poor dividing quality.
- Ease of cleaning — The machine should be easy to disassemble for cleaning: removable chamber, removable blades, accessible surfaces, no hidden crevices where dough can accumulate. Quick disassembly saves time and improves hygiene.
- Noise level — Hydraulic pumps can be noisy. Look for machines with noise-dampening features or quiet pumps. A machine that's 65-70 dB is acceptable; 75+ dB may require hearing protection.
- Warranty and support — Minimum 1-year warranty. Check: what's covered (parts? labor?), how are spare parts supplied (how long to receive?), is there local service or only factory support?, and what's the expected machine lifespan (should be 8-15+ years with proper maintenance).
Step 4: Compare Suppliers
When comparing suppliers, ask these questions:
- How long has the factory been making hydraulic dough dividers? (5+ years preferred)
- Can they provide customer references or testimonials?
- Do they have CE certification? ISO 9001? Other relevant certifications?
- What's the lead time? (Standard: 15-30 days for stock machines; 30-60 days for custom)
- What's included in the price? (Machine? Spare parts? Training? Shipping? Installation?)
- What's the warranty? What does it cover? How are warranty claims handled?
- How quickly can spare parts be supplied? (Critical — a broken blade or seal can stop production)
- Can they provide a video of the machine in operation? (Better than photos — you can see actual performance)
- Do they offer customization? (Different voltage, cavity configurations, special features)
⚠️ Red Flags to Avoid
- Price too good to be true — A 36-cavity stainless steel hydraulic divider for $3,000 is suspicious. It may use cheap hydraulic components, thin steel, or have poor quality control.
- No CE certification — CE is the minimum safety standard for bakery equipment. Without it, the machine may not meet safety requirements and could be difficult to insure or register.
- No spare parts availability — If the supplier can't tell you how to get replacement blades or seals, walk away. Every machine needs spare parts eventually.
- No warranty or very short warranty — Less than 1 year warranty is a red flag. A reputable manufacturer stands behind their product for at least 1-2 years.
- Painted steel food-contact surfaces — Food-contact parts must be stainless steel. Painted steel can chip, contaminate food, and rust in a bakery environment.
- No safety guard or emergency stop — These are non-negotiable safety features. A machine without them is dangerous and may not meet OSHA/CE requirements.
- Unwilling to provide references or videos — A reputable supplier should be happy to show you their machines in operation and provide customer references.
8. Operation & Best Practices
Proper operation ensures accurate dividing, extends machine life, and prevents safety incidents. Follow these best practices.
Pre-Operation Checklist
- Check hydraulic fluid level — should be between min and max marks on the reservoir. Add food-grade hydraulic fluid if low.
- Inspect hydraulic hoses for leaks, cracks, or wear. Replace if damaged.
- Check blades for sharpness and damage. Dull blades should be sharpened or replaced.
- Clean chamber and blades — remove any residue from previous use.
- Lightly flour or oil the chamber (if recommended by manufacturer) to prevent sticking.
- Verify safety guard is in place and interlock switch works (machine should not start with guard open).
- Test emergency stop button — press it, machine should stop immediately.
- Check pressure gauge — should read 0 when idle, rise to specified range during operation.
- Ensure machine is on stable, level ground. Lock casters if equipped.
- Verify power connection is secure and voltage matches machine requirements.
Operating Procedure
- Prepare dough: After bulk fermentation, weigh dough into blocks that match the chamber capacity. For a 36-cavity machine dividing 500g loaves, each block should be about 18-19kg (slightly more than 36×500g=18kg to ensure full cavity filling). Dough temperature: 24-26°C (75-79°F).
- Load chamber: Place dough block into the dividing chamber. Press evenly into all corners and cavities using your hands or the machine's pressing plate. Ensure no air pockets — air pockets cause uneven pieces. The dough should fill the chamber completely and slightly overflow (excess is trimmed or pressed in).
- Close guard: Lower the safety guard/cover. The machine will not start unless the guard is properly closed (interlock switch).
- Start cycle: Press and hold the start button (some machines require two-hand operation for safety). The hydraulic pump activates, blades descend through the dough. Hold until blades are fully down (5-8 seconds), then release.
- Wait for retraction: The blades automatically retract (or press retract button). Wait until blades are fully raised and the machine has stopped before opening the guard.
- Open guard and remove pieces: Lift the safety guard. Remove the divided dough pieces from the chamber cavities. Transfer to worktable or conveyor for shaping. Use a dough scraper if pieces stick.
- Quick clean: Wipe any dough residue from chamber and blades with a dry cloth or scraper. Do not use water on the machine during operation (can damage hydraulic components).
- Repeat: Load next dough block and repeat the cycle.
Best Practices for Accurate Dividing
- Consistent dough temperature — Dough that's too warm (above 28°C) is soft and sticky; too cold (below 22°C) is stiff and resists dividing. Keep dough at 24-26°C for best results.
- Even chamber filling — The #1 cause of uneven pieces is uneven chamber filling. Take time to press dough evenly into all cavities. Use the machine's pressing plate if available.
- Don't overfill or underfill — Overfill causes dough to squeeze out and creates uneven pieces; underfill leaves cavities partially empty. Weigh each dough block to ensure consistent fill.
- Keep blades sharp — Dull blades tear dough instead of cutting, causing ragged edges and weight variation. Sharpen or replace blades every 3-6 months depending on usage.
- Use the right amount of flour/oil — Too much flour creates dry patches and affects dough quality; too little causes sticking. Follow manufacturer recommendations. A light dusting is usually sufficient.
- Let dough rest before dividing — Dough straight from the mixer is tense and elastic. Let it rest 10-15 minutes after bulk fermentation before dividing. This relaxes the gluten and makes dividing easier and more accurate.
- Maintain consistent hydraulic pressure — If the pressure gauge fluctuates or reads below the manufacturer's specification, the machine may not cut completely. Check fluid level, hoses, and pump.
- Calibrate regularly — Every 1-3 months, weigh 5-10 pieces from a single cycle and check for variation. If variation exceeds ±2%, the machine may need calibration or blade replacement.
Safety Rules
⚠️ Critical Safety Rules — Never Violate These
- Never put hands in the chamber while the machine is running — The blades exert hundreds of pounds of force and can cause severe injury. Always wait for the machine to fully stop before reaching in.
- Never bypass the safety guard or interlock switch — These are designed to protect you. If the guard is damaged or the interlock doesn't work, stop using the machine and repair it immediately.
- Always use the emergency stop if something goes wrong — If dough gets stuck, the machine makes unusual noises, or you see a leak, hit the emergency stop immediately. Don't try to fix problems while the machine is running.
- Keep the work area clean and dry — Hydraulic fluid on the floor is a slip hazard. Clean up spills immediately. Keep the area around the machine clear of obstacles.
- Don't overload the machine — Don't try to divide dough blocks larger than the manufacturer's specified maximum. Overloading can damage the hydraulic pump, bend blades, or crack the chamber.
- Only trained operators should use the machine — New employees must be trained on proper operation, safety procedures, and emergency shutdown before using the machine independently.
- Never leave the machine unattended during operation — Stay at the machine during the full cycle. If you need to leave, press emergency stop first.
- Disconnect power before cleaning or servicing — Always unplug the machine (or turn off the circuit breaker) before cleaning, blade replacement, or any maintenance. This prevents accidental startup.
9. Maintenance & Care
Proper maintenance is essential for accurate dividing, long machine life, and safe operation. A well-maintained hydraulic divider can last 10-15+ years; a neglected one may fail in 2-3 years.
Daily Maintenance (5-10 minutes, after each use)
- Clean all surfaces — Wipe down the exterior, chamber, blades, and work area with a food-safe sanitizer. Remove all dough residue. Do not use abrasive cleaners or steel wool on stainless steel (causes scratches).
- Remove and clean blades — If blades are removable, take them out and clean thoroughly. Dry immediately to prevent rust. Apply a light coat of food-grade oil if storing for more than a day.
- Check hydraulic fluid level — Look at the sight glass or dipstick. Fluid should be between min and max marks. If low, check for leaks and add manufacturer-recommended food-grade hydraulic fluid.
- Inspect for leaks — Look under and around the machine for hydraulic fluid. Check all hose connections, the pump, and the cylinder. Even a small leak should be investigated — it can become a big problem.
- Check blade condition — Inspect blades for nicks, dullness, or damage. A damaged blade can cause uneven dividing and is a safety hazard.
- Test emergency stop — Press the emergency stop button to verify it works. The machine should stop immediately. Release and reset before next use.
- Clean work area — Sweep or vacuum flour and dough debris from around the machine. Keep the area clean and dry.
Weekly Maintenance (15-20 minutes)
- Deep clean chamber and blades — Remove chamber (if removable) and wash with warm soapy water. Rinse and dry thoroughly. Clean blades with a soft brush and warm soapy water. Do not put blades in dishwasher (can dull edges).
- Check hydraulic hoses — Inspect all hoses for cracks, bulges, abrasion, or leaks. Pay special attention to hose fittings and bends. Replace any hose that shows signs of wear — a burst hose can cause hydraulic fluid spray and machine failure.
- Lubricate moving parts — Apply food-grade lubricant to: blade guide rails, chamber sliding surfaces, hinge points, and any other moving parts specified by the manufacturer. Do not over-lubricate — excess lubricant can drip into dough.
- Check blade alignment — With the machine off and power disconnected, manually lower the blade assembly (if possible) and check that blades align properly with chamber cavities. Misaligned blades can bind, cause uneven cuts, or damage the chamber.
- Test dividing accuracy — Run a test cycle with dough, then weigh 5-10 pieces individually. Calculate the average and variation. Variation should be within ±1-2%. If not, investigate causes (dull blades, uneven filling, pressure issues).
- Check electrical connections — Inspect the power cord for damage. Check that the plug is secure and not overheating. Tighten any loose connections. Do not use the machine if the power cord is damaged.
- Clean hydraulic fluid reservoir exterior — Wipe down the outside of the reservoir. Check that the filler cap is secure and the breather (if equipped) is clean.
Monthly Maintenance (30-45 minutes)
- Change hydraulic fluid (or every 6 months) — Drain old hydraulic fluid completely. Flush the system with clean fluid if recommended. Refill with manufacturer-recommended food-grade hydraulic oil (typically ISO 32 or ISO 46 viscosity). Check level after running the machine for a few minutes (air bubbles need to escape).
- Replace hydraulic fluid filter — If the machine has a filter element, replace it at the same time as the fluid change. A clogged filter restricts flow and can cause pressure problems.
- Inspect hydraulic pump — Listen for unusual noises (grinding, whining, knocking) during operation. Check pump mounting bolts are tight. Inspect for leaks around the pump shaft seal.
- Check and tighten all fasteners — Go through the machine and check that all bolts, nuts, and screws are tight. Vibration during operation can loosen fasteners over time. Pay special attention to: blade mounting bolts, chamber mounting, motor/pump mounting, and frame bolts.
- Inspect seals and gaskets — Check for signs of seal failure: fluid leaks around the cylinder shaft, chamber seals, or hose fittings. Replace any seal that shows signs of leakage. Seals are inexpensive but can cause major problems if they fail.
- Calibrate dividing accuracy — Perform a full accuracy test: run 3 consecutive cycles, weigh all pieces from each cycle (30-100 pieces total), calculate average weight and standard deviation. If accuracy has drifted, adjust cavity spacers, sharpen blades, or have the machine professionally calibrated.
- Test safety systems — Test: emergency stop (should stop immediately), safety guard interlock (machine should not start with guard open), overload protection (machine should shut off if overloaded), and pressure relief valve (should open at specified max pressure).
- Clean electrical panel — If accessible, blow out dust from the electrical panel with compressed air (low pressure). Check for loose wires or overheated components. Do not touch electrical components if you're not qualified — have an electrician do this.
Annual Professional Service (by qualified technician)
- Replace worn blades — Even with sharpening, blades eventually wear out. Replace annually or when sharpening no longer restores a clean cut. Keep spare blades on hand.
- Replace hydraulic hoses — Hoses degrade over time (rubber hardens, reinforcement fatigues). Replace all hoses every 3-5 years, or sooner if showing wear. This prevents unexpected burst failures.
- Service hydraulic pump and valves — Have a qualified hydraulic technician inspect and service the pump, control valves, and pressure relief valve. This includes checking pump wear, valve operation, and pressure calibration.
- Replace cylinder seals — The main hydraulic cylinder seals wear over time, causing slow operation or pressure loss. Replace cylinder seals every 3-5 years as preventive maintenance.
- Full machine calibration — Have the machine professionally calibrated: pressure settings, blade alignment, cavity accuracy, and safety systems. This ensures the machine operates at peak performance.
- Inspect and service motor — Check motor bearings, winding insulation, and cooling fan. Lubricate motor bearings if specified. A failing motor can cause unexpected downtime.
- Check frame and structure — Inspect the machine frame for cracks, bending, or corrosion. Check welds for integrity. The frame bears significant force during operation and must be structurally sound.
- Update maintenance log — Record all maintenance performed, parts replaced, and any issues found. This helps track the machine's health and is valuable for warranty claims or resale.
🔧 Hydraulic Fluid: The Lifeblood of Your Machine
Hydraulic fluid is not just oil — it transmits power, lubricates, and cools the system. Using the wrong fluid or neglecting fluid changes is the #1 cause of hydraulic system failure. Key points: (1) Use only food-grade hydraulic fluid (ISO 32 or ISO 46 viscosity as specified by manufacturer). Non-food-grade fluid can contaminate dough if it leaks. (2) Change fluid every 6 months or 1,000 operating hours, whichever comes first. Old fluid breaks down, loses viscosity, and accumulates contaminants that damage the pump and valves. (3) Never mix different types or brands of hydraulic fluid — they may be incompatible and cause foaming, reduced lubrication, or system damage. (4) Check fluid level daily — low fluid causes the pump to suck air, which causes spongy operation, noise, and can damage the pump. (5) Keep the fluid reservoir clean — never open the filler cap in a dusty environment. Contaminants in the fluid act like sandpaper, wearing out pump and valve components.
10. Troubleshooting
Even well-maintained machines can develop problems. Use this troubleshooting guide to diagnose and fix common issues.
Dividing Quality Problems
| Problem | Possible Cause | Solution |
|---|---|---|
| Pieces are uneven weight (variation>2%) | 1. Uneven chamber filling; 2. Dull blades; 3. Low hydraulic pressure; 4. Misaligned blades; 5. Dough too warm/soft | 1. Press dough evenly, weigh each block; 2. Sharpen or replace blades; 3. Check fluid level, pump, pressure; 4. Realign blade assembly; 5. Cool dough to 24-26°C |
| Pieces are connected/not fully cut | 1. Low hydraulic pressure; 2. Dull blades; 3. Dough too stiff/cold; 4. Overfilled chamber; 5. Blade speed too fast | 1. Check pressure, fluid, pump; 2. Sharpen/replace blades; 3. Warm dough to 24-26°C; 4. Reduce dough block weight; 5. Check for speed adjustment, slow down if possible |
| Pieces have ragged/torn edges | 1. Dull blades; 2. Dough too soft/sticky; 3. Blades not clean (dough buildup); 4. Blade speed too slow | 1. Sharpen/replace blades; 2. Reduce dough temp, use more flour; 3. Clean blades between cycles; 4. Check hydraulic pressure, increase if adjustable |
| Pieces stick to chamber/blades | 1. Not enough flour/oil; 2. Dough too warm/sticky; 3. Chamber surface scratched/damaged; 4. High humidity environment | 1. Apply more flour or food-grade oil; 2. Cool dough, reduce hydration slightly; 3. Polish or replace damaged chamber; 4. Use air conditioning/dehumidifier |
| Some cavities are empty/underfilled | 1. Uneven dough distribution; 2. Air pockets in dough; 3. Dough block too small; 4. Chamber not level | 1. Press dough carefully into all cavities; 2. Degas dough before loading, press out air; 3. Increase dough block weight; 4. Level machine with adjustable feet |
| Pieces are deformed/misshapen | 1. Dough too soft; 2. Blades binding; 3. Chamber damaged; 4. Removing pieces too roughly | 1. Cool dough, reduce hydration; 2. Lubricate blade guides, check alignment; 3. Repair/replace chamber; 4. Handle pieces gently, use scraper |
Hydraulic System Problems
| Problem | Possible Cause | Solution |
|---|---|---|
| Machine won't start / no pressure | 1. No power (check outlet, circuit breaker); 2. Emergency stop engaged; 3. Safety guard open (interlock); 4. Low hydraulic fluid; 5. Motor failure; 6. Pump failure | 1. Check power, reset breaker; 2. Reset emergency stop; 3. Close guard properly; 4. Add hydraulic fluid; 5. Test motor, replace if failed; 6. Service/replace pump |
| Blades move slowly / weak pressure | 1. Low hydraulic fluid; 2. Clogged filter; 3. Worn pump; 4. Internal leak (cylinder seals); 5. Wrong viscosity fluid; 6. Air in system | 1. Add fluid; 2. Replace filter; 3. Service/replace pump; 4. Replace cylinder seals; 5. Drain and refill with correct fluid; 6. Bleed air from system (run cycle several times with guard open) |
| Blades don't retract / get stuck down | 1. Control valve failure; 2. Low pressure on retract side; 3. Blades binding in guides; 4. Electrical fault (retract solenoid) | 1. Service/replace control valve; 2. Check pressure, pump, fluid; 3. Lubricate guides, realign blades; 4. Check electrical connections, replace solenoid |
| Hydraulic fluid leak | 1. Loose hose fitting; 2. Damaged/cracked hose; 3. Failed seal (cylinder, pump, valve); 4. Cracked reservoir; 5. Overfilled reservoir | 1. Tighten fitting (don't over-tighten); 2. Replace hose; 3. Replace seal; 4. Weld or replace reservoir; 5. Drain excess fluid to correct level |
| Hydraulic fluid overheating | 1. Low fluid level; 2. Clogged filter; 3. Worn pump (internal leakage generates heat); 4. Continuous operation without cool-down; 5. High ambient temperature; 6. Wrong viscosity fluid (too thick) | 1. Add fluid; 2. Replace filter; 3. Service/replace pump; 4. Allow cool-down periods, install cooler; 5. Improve ventilation, use AC; 6. Drain and refill with correct viscosity |
| Unusual noise (grinding/whining) | 1. Low fluid (pump sucking air); 2. Clogged filter (restricted flow); 3. Worn pump bearings/gears; 4. Air in system; 5. Loose components (vibration); 6. Cavitation (pump inlet restriction) | 1. Add fluid, check for leaks; 2. Replace filter; 3. Service/replace pump; 4. Bleed air, check inlet for air leaks; 5. Tighten all fasteners; 6. Check inlet line for restrictions, clean strainer |
| Pressure gauge fluctuates wildly | 1. Air in system; 2. Worn pump; 3. Faulty pressure relief valve; 4. Low fluid; 5. Clogged filter | 1. Bleed air; 2. Service/replace pump; 3. Adjust/replace relief valve; 4. Add fluid; 5. Replace filter |
Electrical Problems
| Problem | Possible Cause | Solution |
|---|---|---|
| Machine trips circuit breaker | 1. Overloaded circuit (other equipment on same circuit); 2. Short circuit in machine; 3. Motor starting current too high; 4. Ground fault | 1. Move machine to dedicated circuit; 2. Inspect wiring for shorts, call electrician; 3. Check motor capacitor, use soft-start; 4. Test for ground fault, call electrician |
| Motor runs but blades don't move | 1. Coupling failure (motor to pump); 2. Pump failure; 3. Control valve stuck closed; 4. Broken belt (if belt-driven) | 1. Replace coupling; 2. Service/replace pump; 3. Clean/replace control valve; 4. Replace belt, check tension |
| Emergency stop won't reset | 1. E-stop button damaged; 2. Electrical fault in E-stop circuit; 3. Machine still has active fault | 1. Replace E-stop button; 2. Check wiring, call electrician; 3. Clear fault (check guard, pressure, etc.) |
| Control panel not working / no display | 1. Power supply failure; 2. Blown fuse; 3. Loose connection; 4. Display/PCB failure | 1. Check power supply; 2. Replace fuse; 3. Check connections; 4. Replace control panel/PCB |
When to Call a Professional
⚠️ Call a Qualified Technician For These Issues
- Hydraulic pump failure or major leak (requires system rebuild)
- Electrical faults (short circuits, ground faults, motor failures) — risk of electrocution
- Cracked or damaged frame/structure (structural integrity concern)
- Pressure system calibration (requires specialized tools and knowledge)
- Control valve or solenoid replacement (requires hydraulic system knowledge)
- Any issue you're not confident you can fix safely — it's better to call a professional than to cause more damage or get hurt
11. Hydraulic vs. Mechanical vs. Manual Dividers
Not sure if a hydraulic divider is right for you? Here's how it compares to other types of dough dividers.
| Feature | Manual Divider | Mechanical Divider | Hydraulic Divider | Volumetric Divider |
|---|---|---|---|---|
| Power source | Hand lever (manual) | Electric motor + gears/cam | Electric motor + hydraulic pump | Electric motor + auger/piston |
| Price range | $500-$2,000 | $2,000-$5,000 | $3,000-$15,000+ | $5,000-$20,000+ |
| Capacity (pieces/cycle) | 9-36 | 10-36 | 10-60+ | Continuous (1,000-5,000/hr) |
| Portion size range | 30-500g | 50-800g | 50g-5kg+ | 20-500g |
| Accuracy | ±3-5% | ±2-3% | ±1-2% | ±1-2% |
| Output (pieces/hour) | 100-300 | 300-800 | 500-3,000+ | 1,000-5,000+ |
| Labor requirement | High (physical effort) | Medium (load/unload only) | Low (load/unload only) | Very low (continuous) |
| Dough block size | Small (3-10kg) | Medium (5-15kg) | Large (5-50kg) | N/A (continuous feed) |
| Best for | Small bakeries, start-ups, low volume | Small-medium bakeries, moderate volume | Medium-large bakeries, pizza, high volume | Industrial, very high volume, rolls/buns |
| Maintenance complexity | Low (simple mechanism) | Medium (gears, cams, motor) | Medium (hydraulic system) | High (auger, sensors, controls) |
| Durability/lifespan | 5-10 years | 8-12 years | 10-15+ years | 10-15 years |
Which Type Is Right for You?
- Choose manual if: You produce under 100 loaves/day, have a limited budget (<$2,000), have limited space, or are just starting out. A manual divider is a good entry-level tool, but you'll quickly outgrow it as production increases.
- Choose mechanical if: You produce 100-400 loaves/day, have a budget of $2,000-$5,000, and want a simple, reliable machine without the complexity of hydraulics. Mechanical dividers are good for small-medium bakeries but have limited portion size range and may struggle with very stiff or large dough blocks.
- Choose hydraulic if: You produce 300+ loaves/day, need to divide large dough blocks (10kg+) or large portions (1kg+), want the highest accuracy (±1-2%), or plan for growth. Hydraulic dividers are the most versatile and durable option for medium-large bakeries. The extra cost is justified by higher accuracy, larger capacity, and longer lifespan.
- Choose volumetric if: You produce 2,000+ rolls/buns per day, need continuous high-speed production, and primarily make small uniform portions (rolls, buns, pizza dough balls). Volumetric dividers are the fastest but are less flexible for different dough types and portion sizes, and are more complex to maintain.
💡 The Sweet Spot: Hydraulic for Most Growing Bakeries
For most bakeries that are past the start-up phase and producing 300+ loaves/day, a hydraulic dough divider is the best investment. Here's why: (1) It handles the widest range of dough types and portion sizes — from 50g rolls to 5kg bread blocks. (2) It has the highest accuracy (±1-2%), which means less wasted dough and more consistent products. (3) It's the most durable — with proper maintenance, a hydraulic divider lasts 10-15+ years, compared to 5-10 for manual and 8-12 for mechanical. (4) It has the lowest labor requirement — one operator can run it, and the hydraulic system does all the hard work. (5) It grows with you — a 36-cavity hydraulic divider can handle everything from 300 to 2,000 loaves/day, so you won't outgrow it quickly. The upfront cost is higher than manual or mechanical, but the total cost of ownership over 10 years is actually lower when you factor in labor savings, reduced waste, and longer lifespan.
📋 Bakery Equipment Checklist
Download our complete bakery equipment checklist with budget estimates for 5 different bakery types.
Free Bakery Equipment Checklist →📋 Bakery Equipment ROI Calculator
Use our interactive ROI calculator to see how quickly your bakery equipment investment pays off.
Calculate Your Equipment ROI →📋 Bakery Equipment Maintenance Calendar
Get our printable maintenance calendar to keep your bakery equipment running at peak performance.
Printable Maintenance Calendar →📋 Bakery Equipment Energy Cost Calculator
Estimate your bakery equipment energy costs and find ways to reduce your utility bills.
Calculate Energy Costs →🏭 Bakery Equipment Capacity Calculator
Not sure what size equipment you need? Use our free interactive calculator to find the perfect dough divider, mixer, oven, and proofer capacity for your production volume.
Calculate Your Equipment Needs →⚖️ Bakery Equipment Comparison Tool
Compare dough dividers, spiral mixers, ovens, proofers and dough sheeters side by side. View specs, prices, capacity and features to find the best equipment for your bakery.
Compare Equipment Now →12. FAQ
Can a hydraulic dough divider handle gluten-free dough?
Yes, but with some adjustments. Gluten-free dough is typically softer and stickier than wheat dough, and doesn't have the same elastic structure. To divide gluten-free dough: (1) Use slightly more flour or oil in the chamber to prevent sticking; (2) Reduce dough block size slightly (gluten-free dough can be more compressible); (3) Ensure blades are very sharp (clean cut is more important with gluten-free); (4) Some bakers prefer to divide gluten-free dough by volume rather than weight, as it can be more consistent. Test with a small batch first to find the right settings for your specific gluten-free formula.
How often should I sharpen the blades?
Blade sharpening frequency depends on usage: (1) Light use (under 2 hours/day): every 3-6 months; (2) Medium use (2-4 hours/day): every 2-3 months; (3) Heavy use (4+ hours/day): every 1-2 months. Signs that blades need sharpening: ragged/torn dough edges, increased weight variation, dough sticking to blades, or the machine needing more pressure/force to cut. You can sharpen blades yourself with a sharpening stone or send them to a professional knife sharpening service. Always keep a spare set of blades on hand so you don't have to stop production while blades are being sharpened.
Can I use a hydraulic divider for very stiff dough (like bagel or pretzel dough)?
Yes, hydraulic dividers handle stiff dough better than mechanical or manual dividers because the hydraulic system provides consistent, powerful cutting force. However, very stiff dough (below 50% hydration) requires: (1) A machine with sufficient hydraulic pressure (at least 80-100 bar); (2) Sharp blades (stiff dough is harder to cut cleanly); (3) Slightly smaller dough blocks (don't overload the machine); (4) Slower cycle speed if adjustable. If you primarily make very stiff dough, look for a machine with higher pressure ratings and heavy-duty blade construction. Bagel and pretzel dough (40-45% hydration) can be divided, but it's more demanding on the machine than standard bread dough (60-65% hydration).
What's the difference between a dough divider and a dough rounder?
A dough divider cuts dough into uniform pieces by weight. A dough rounder takes those divided pieces and rounds them into smooth balls (for rolls, buns, pizza dough, or pre-shaping). Many bakeries use both: divider first, then rounder. Some machines combine both functions (divider-rounder), but these are typically mechanical rather than hydraulic. For a hydraulic divider, you'll need a separate rounder or do rounding by hand if you need rounded pieces. For bread loaves, rounding isn't necessary — the divided pieces go directly to shaping.
How do I clean a hydraulic dough divider properly?
Follow these cleaning steps: (1) Disconnect power (unplug or turn off breaker) — never clean a machine that's plugged in; (2) Remove chamber and blades (if removable) — take them to a sink for washing; (3) Wash chamber and blades with warm soapy water and a soft brush — do not use abrasive scouring pads or steel wool (scratches stainless steel and dulls blades); (4) Rinse thoroughly with clean water; (5) Dry immediately with a clean towel — don't let stainless steel air-dry (causes water spots and can promote corrosion); (6) Wipe machine exterior with food-safe sanitizer and a soft cloth; (7) Apply a light coat of food-grade oil to blades before storing (prevents rust); (8) Reassemble once everything is completely dry. Do NOT use a pressure washer or hose down the machine — water can damage electrical components and the hydraulic system. Do NOT put blades in the dishwasher — the harsh detergent and high heat can dull edges and cause corrosion.
Can I upgrade my hydraulic divider later (add cavities, automation)?
Some upgrades are possible, others are not: (1) Interchangeable cavity plates — if your machine supports them, you can buy additional plates with different cavity counts or sizes. This is the most common and cost-effective upgrade. (2) Automatic pressing — some machines can be retrofitted with an automatic dough pressing system, but this depends on the machine's design and may require factory modification. (3) Conveyor system — adding a conveyor to a manual-load machine is usually not cost-effective; it's better to buy a machine designed for conveyor integration from the start. (4) Digital controls — upgrading from basic buttons to a digital control panel may be possible on some machines, but requires electrical modification. (5) Increasing cavity count beyond the machine's design — NOT possible. The chamber size and hydraulic capacity are fixed at manufacture. If you need more cavities, you need a larger machine. When buying, choose a machine with interchangeable cavity plates — this gives you the most flexibility for future changes without buying a new machine.
How much space do I need for a hydraulic dough divider?
Space requirements by machine size: (1) Tabletop 10-20 cavity: 600×600mm (24×24 inches) of table space, plus 300mm (12 inches) clearance on all sides for operation and ventilation. Height: 600mm (24 inches). (2) Floor 20-36 cavity: 800×700mm (31×28 inches) footprint, plus 500mm (20 inches) clearance on all sides (especially the front for loading/unloading and the back for ventilation/hoses). Height: 1,400mm (55 inches). (3) Large 60-cavity: 1,200×1,000mm (47×39 inches) footprint, plus 600mm (24 inches) clearance all around. Height: 1,800mm (71 inches). (4) Fully automatic with conveyor: 2,000×3,000mm (6.5×10 feet) or more, depending on conveyor length. Also consider: doorways and hallways for delivery (the machine must fit through), floor load capacity (large machines weigh 500-1,000kg+), and proximity to other equipment (don't place next to ovens — heat can affect hydraulic fluid).
What's the expected lifespan of a hydraulic dough divider?
With proper maintenance, a hydraulic dough divider lasts 10-15+ years. The hydraulic system (pump, valves, cylinder) is the most durable component — industrial hydraulic components can last 20+ years with proper fluid maintenance. The parts that wear out and need replacement: blades (every 1-3 years depending on usage), hoses (every 3-5 years), seals (every 3-5 years), and fluid/filter (every 6 months). The frame and chamber should last the life of the machine if not abused. Factors that shorten lifespan: neglecting fluid changes (the #1 cause of hydraulic system failure), using non-food-grade or wrong-viscosity fluid, overloading the machine, not cleaning properly (dough buildup causes corrosion), and operating without safety guards (can cause damage from foreign objects). A well-maintained $6,000 Chinese hydraulic divider can easily last 10+ years — that's $600/year, or about $0.50 per operating day. Very cost-effective equipment.